MS PowerPoint Slide Show Tab
MS PowerPoint Slide Show Tab – पूरी जानकारी हिंदी में
PowerPoint Slide Show Tab का उपयोग Presentation को Run, Present, Record और Configure करने के लिए किया जाता है।
यह Tab मुख्य रूप से यह निर्धारित करता है कि Presentation audience के सामने कैसे चलेगी, Slides किस क्रम में दिखाई देंगी, Timing कैसे काम करेगी और Presentation को किस Monitor पर दिखाया जाएगा।
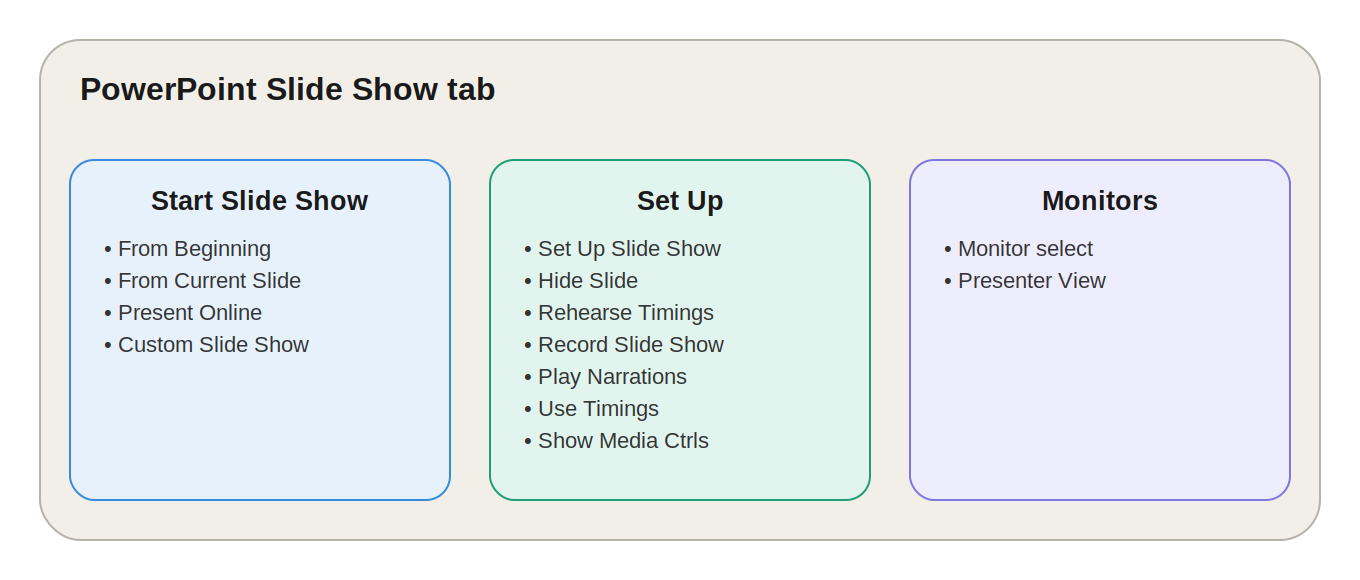
PowerPoint में Slide Show Tab के मुख्य रूप से 3 Groups होते हैं:
-
Start Slide Show
-
Set Up
-
Monitors
1. Start Slide Show Group
Start Slide Show Group का उपयोग Presentation को शुरू करने और अलग-अलग तरीके से Present करने के लिए किया जाता है।
इसके मुख्य options हैं:
-
From Beginning
-
From Current Slide
-
Present Online
-
Custom Slide Show
From Beginning
From Beginning का उपयोग Presentation को पहली Slide यानी Slide 1 से शुरू करने के लिए किया जाता है।
Shortcut Key
F5 → From Beginning
उदाहरण
यदि आपकी Presentation में 30 Slides हैं और आप Slide 1 से पूरी Presentation शुरू करना चाहते हैं, तो From Beginning का उपयोग करेंगे।
Exam Point
F5 से PowerPoint Slide Show Beginning से शुरू किया जाता है।
From Current Slide
From Current Slide का उपयोग उस Slide से Presentation शुरू करने के लिए किया जाता है जिसे आप वर्तमान में PowerPoint Editor में select किए हुए हैं।
Shortcut Key
Shift + F5 → From Current Slide
उदाहरण
मान लीजिए आपकी Presentation में 30 Slides हैं और आप अभी Slide 15 पर काम कर रहे हैं।
पूरी Presentation Slide 1 से शुरू करने की बजाय आप From Current Slide से सीधे Slide 15 से Show शुरू कर सकते हैं।
उपयोग
-
किसी specific Slide को test करने के लिए
-
Animation check करने के लिए
-
Presentation के किसी particular section को rehearse करने के लिए
Present Online
Present Online का उपयोग Presentation को remote audience के साथ online share/present करने के लिए किया जा सकता है।
इसका उद्देश्य यह है कि दूर बैठे लोग Presentation को online follow कर सकें।
उपयोग
-
Online Meeting
-
Remote Presentation
-
Online Training
-
Remote Teaching
Note: इसकी exact availability और options PowerPoint version तथा Microsoft 365 services के अनुसार अलग हो सकते हैं।
Custom Slide Show
Custom Slide Show का उपयोग पूरी Presentation में से केवल selected Slides को एक specific order में Present करने के लिए किया जाता है।
उदाहरण
मान लीजिए आपकी Master Presentation में 50 Slides हैं।
एक customer के लिए आपको केवल:
Slide 1 → 3 → 5 → 10 → 15 → 20
दिखानी हैं।
ऐसे में अलग Presentation File बनाने की आवश्यकता नहीं है। Custom Slide Show बनाकर selected Slides को Present किया जा सकता है।
फायदा
एक ही Master Presentation से अलग-अलग audiences के लिए अलग-अलग Slide Sets तैयार किए जा सकते हैं।
Exam Point
Custom Slide Show selected Slides का customized Presentation तैयार करता है।
2. Set Up Group
Set Up Group का उपयोग Presentation की playback और presentation settings को configure करने के लिए किया जाता है।
इसके मुख्य options हैं:
-
Set Up Slide Show
-
Hide Slide
-
Rehearse Timings
-
Record Slide Show
-
Play Narrations
-
Use Timings
-
Show Media Controls
Set Up Slide Show
Set Up Slide Show से Presentation के लिए विभिन्न settings निर्धारित की जा सकती हैं।
इसमें Presentation के अनुसार options मिल सकते हैं, जैसे:
-
Show Type
-
Slides to Show
-
Loop continuously
-
Narrations
-
Animations
-
Presentation behavior
-
Pen/laser pointer settings
Show Type
Presentation को अलग-अलग तरीके से configure किया जा सकता है, जैसे:
-
Presented by a speaker
-
Browsed by an individual
-
Browsed at a kiosk
Loop Continuously
यदि Presentation को बार-बार automatically चलाना हो, तो Loop continuously option उपयोगी होता है।
उदाहरण
किसी Exhibition या Reception पर लगातार चलने वाली Information Presentation में Loop option उपयोग किया जा सकता है।
Hide Slide
Hide Slide का उपयोग किसी Slide को Presentation File में रखते हुए उसे normal Slide Show से skip करने के लिए किया जाता है।
इससे Slide delete नहीं होती।
उदाहरण
मान लीजिए आपकी Presentation में एक Backup Slide है जिसे केवल जरूरत पड़ने पर दिखाना है।
आप उस Slide को Hide Slide कर सकते हैं।
Slide File में मौजूद रहेगी लेकिन सामान्य Slide Show में दिखाई नहीं देगी।
Exam Point
Hide Slide = Slide को Delete किए बिना Slide Show से छिपाना।
Rehearse Timings
Rehearse Timings का उपयोग Presentation की प्रत्येक Slide पर लगने वाले समय को practice और record करने के लिए किया जाता है।
PowerPoint Presentation चलाता है और Timer की मदद से यह record किया जा सकता है कि आपने प्रत्येक Slide पर कितना समय बिताया।
उदाहरण
मान लीजिए:
-
Slide 1 → 20 seconds
-
Slide 2 → 45 seconds
-
Slide 3 → 30 seconds
Rehearse Timings के माध्यम से इन timings को record किया जा सकता है।
उपयोग
यह विशेष रूप से Self-Running Presentation बनाने में उपयोगी है।
Record Slide Show
Record Slide Show का उपयोग Presentation की recording बनाने के लिए किया जाता है।
उपलब्ध features के अनुसार इसमें record किया जा सकता है:
-
Narration
-
Slide Timings
-
Ink/Pen movements
-
Presenter Camera/Webcam
उदाहरण
यदि आप एक Educational Presentation बनाकर उसे बाद में Students को देना चाहते हैं, तो Slides के साथ अपनी Voice/Narration और उपलब्ध camera recording भी record कर सकते हैं।
उपयोग
-
Online Training
-
Recorded Classes
-
Webinars
-
Tutorials
-
Educational Videos
Play Narrations
Play Narrations option यह निर्धारित करता है कि पहले से recorded Narration/Voice Slide Show के दौरान चलेगी या नहीं।
Example
यदि आपने Presentation में अपनी Voice record की है और उसे Presentation के दौरान सुनाना चाहते हैं, तो Play Narrations enabled होना चाहिए।
Use Timings
Use Timings यह निर्धारित करता है कि पहले से saved या rehearsed Slide Timings का उपयोग करके Slides automatically आगे बढ़ेंगी या नहीं।
उदाहरण
मान लीजिए आपने Rehearse Timings में:
Slide 1 = 10 sec
और
Slide 2 = 15 sec
set किया है।
Use Timings enabled होने पर Slides इन timings के अनुसार automatically advance हो सकती हैं।
Important Point
यदि automatic Slide advance नहीं चाहिए, तो Use Timings को enable न करना उपयोगी हो सकता है।
Show Media Controls
Show Media Controls का उपयोग Slide Show के दौरान inserted Video या Audio के playback controls दिखाने या छिपाने के लिए किया जाता है।
इन controls में उपलब्ध media के अनुसार:
-
Play
-
Pause
-
Progress
जैसे controls दिखाई दे सकते हैं।
Exam Point
Show Media Controls = Slide Show में Media Playback Controls को control करना।
3. Monitors Group
Monitors Group का उपयोग Multiple Displays या Projector के साथ Presentation को manage करने के लिए किया जाता है।
इसके मुख्य options हैं:
-
Monitor
-
Use Presenter View
Monitor
जब Computer से दूसरा Monitor, TV या Projector connected हो, तो Monitor option से Presentation output के लिए Monitor select किया जा सकता है।
Example
आपके पास:
Laptop + Projector
connected हैं।
Audience को Presentation Projector पर दिखाई जा सकती है, जबकि Presenter अपने Laptop Screen का उपयोग कर सकता है।
Use Presenter View
Presenter View PowerPoint का बहुत useful feature है।
इसमें Presenter और Audience को अलग-अलग information दिखाई जाती है।
Audience क्या देखती है?
Audience को:
-
Current Slide
-
Full-screen Presentation
दिखाई जाती है।
Presenter क्या देखता है?
Presenter को अपने Screen पर उपलब्ध layout के अनुसार:
-
Current Slide
-
Next Slide Preview
-
Speaker Notes
-
Timer
-
Navigation Controls
जैसी information दिखाई दे सकती है।
इससे Presenter को बिना Audience को दिखाए अपनी Notes और अगली Slide देखने में मदद मिलती है।
Example
Presenter Projector की Screen पर केवल Slide दिखाता है, जबकि Laptop Screen पर:
Current Slide + Next Slide + Notes + Timer
देख सकता है।
Exam Point
Presenter View Presenter को Notes और Next Slide privately देखने में मदद करता है।
Presenter View का फायदा
Presenter View विशेष रूप से Live Presentation में उपयोगी है।
इसके फायदे:
-
Speaker Notes privately देख सकते हैं।
-
Next Slide पहले से देख सकते हैं।
-
Presentation का Time monitor कर सकते हैं।
-
Audience को केवल required Slide दिखाई देती है।
-
Presentation को अधिक confidently deliver किया जा सकता है।
Slide Show Tab का Real-Life Example
मान लीजिए आपको Company Training Presentation देनी है।
आपके पास 25 Slides हैं।
Step 1 – Presentation शुरू करना
From Beginning (F5) से Presentation शुरू करें।
Step 2 – Practice
Rehearse Timings से प्रत्येक Slide का Timing practice करें।
Step 3 – Unnecessary Slide
एक Backup Slide को Hide Slide कर दें।
Step 4 – Narration
अगर Recorded Presentation बनानी है, तो Record Slide Show का उपयोग करें।
Step 5 – Automatic Presentation
Recorded Timings को use करने के लिए Use Timings enable कर सकते हैं।
Step 6 – Live Presentation
Projector connected होने पर Presenter View का उपयोग करें।
इस प्रकार Slide Show Tab Presentation को properly Run, Practice, Record और Present करने में मदद करता है।
Slide Show Tab के Important Shortcuts
| Shortcut | Function |
|---|---|
| F5 | From Beginning |
| Shift + F5 | From Current Slide |
| Esc | Slide Show से Exit |
| → / Spacebar | Next Slide |
| ← | Previous Slide |
| B | Screen को Black करना |
| W | Screen को White करना |
कुछ shortcuts PowerPoint के version या presentation mode के अनुसार अलग व्यवहार कर सकते हैं।
Slide Show Tab – Quick Revision
| Group | Main Options | मुख्य कार्य |
|---|---|---|
| Start Slide Show | From Beginning | Slide 1 से Show शुरू करना |
| Start Slide Show | From Current Slide | Current Slide से Show शुरू करना |
| Start Slide Show | Present Online | Online Presentation |
| Start Slide Show | Custom Slide Show | Selected Slides Present करना |
| Set Up | Set Up Slide Show | Presentation Settings |
| Set Up | Hide Slide | Slide को Show से Hide करना |
| Set Up | Rehearse Timings | Slide Timing Practice/Record करना |
| Set Up | Record Slide Show | Presentation Record करना |
| Set Up | Play Narrations | Recorded Voice चलाना |
| Set Up | Use Timings | Saved Timings का उपयोग |
| Set Up | Show Media Controls | Video/Audio Controls दिखाना |
| Monitors | Monitor | Display Monitor Select करना |
| Monitors | Presenter View | Presenter के लिए Private View |
Slide Show और Animations में अंतर
| Slide Show | Animations |
|---|---|
| पूरी Presentation को Run करता है | Individual Object को Animate करता है |
| Presentation Playback पर focus | Object Effects पर focus |
| Presenter View उपलब्ध | Animation Pane उपलब्ध |
| Timings और Recording manage करता है | Entrance, Emphasis, Exit आदि manage करता है |
| Live Presentation के लिए उपयोगी | Slide Content को Animate करने के लिए उपयोगी |
Slide Show और Transitions में अंतर
| Slide Show | Transitions |
|---|---|
| पूरी Presentation को Run करता है | Slides के बीच Change Effect देता है |
| Presentation Settings control करता है | Slide-to-Slide Effect control करता है |
| Recording और Timings manage करता है | Transition Duration और Sound आदि manage करता है |
| Presenter View उपलब्ध | Transition Effects उपलब्ध |
याद रखने की Trick
Animations → Object
Transitions → Slide Change
Slide Show → पूरी Presentation Run
Slide Show Tab कब इस्तेमाल करें?
1. Presentation शुरू करने के लिए
From Beginning या From Current Slide का उपयोग करें।
2. Presentation की Practice करने के लिए
Rehearse Timings का उपयोग करें।
3. Presentation Record करने के लिए
Record Slide Show का उपयोग करें।
4. Backup Slide छिपाने के लिए
Hide Slide का उपयोग करें।
5. Automatic Presentation बनाने के लिए
Rehearse Timings + Use Timings का उपयोग किया जा सकता है।
6. Projector के साथ Presentation देने के लिए
Presenter View का उपयोग करें।
7. अलग-अलग Audience के लिए अलग Slides दिखाने के लिए
Custom Slide Show का उपयोग करें।
Exam Important Points
-
Slide Show Tab Presentation को Run और Present करने के लिए उपयोग किया जाता है।
-
Slide Show Tab, Animations Tab के बाद आता है।
-
Slide Show Tab में मुख्य रूप से 3 Groups होते हैं।
-
ये Groups हैं: Start Slide Show, Set Up और Monitors।
-
F5 से Presentation Beginning से शुरू होती है।
-
Shift + F5 से Presentation Current Slide से शुरू होती है।
-
From Beginning Slide 1 से Presentation शुरू करता है।
-
From Current Slide selected/current Slide से Presentation शुरू करता है।
-
Custom Slide Show selected Slides का customized Show बनाता है।
-
Hide Slide Slide को Delete किए बिना Slide Show से Skip करता है।
-
Rehearse Timings Slide के लिए Presentation Timing record करने में मदद करता है।
-
Record Slide Show Presentation की Recording बनाने के लिए उपयोग होता है।
-
Play Narrations Recorded Narration को Play/Control करता है।
-
Use Timings Saved/Rehearsed Timings का उपयोग करके Slides को automatically advance कर सकता है।
-
Show Media Controls Audio/Video Playback Controls को control करता है।
-
Monitor से Presentation के लिए Display Monitor select किया जा सकता है।
-
Presenter View Presenter को Notes और Next Slide देखने में मदद करता है।
-
Presenter View Live Presentation में बहुत उपयोगी feature है।
-
Custom Slide Show एक Master Presentation से अलग-अलग audiences के लिए अलग Slide Sets बनाने में उपयोगी है।
-
Hide Slide Backup या Optional Slides के लिए उपयोगी है।
-
Rehearse Timings + Use Timings Self-Running Presentation बनाने में उपयोगी हैं।
-
Slide Show = Presentation Playback
Quick One-Liners
-
Slide Show Tab Presentation को Run और Present करने के लिए उपयोग होता है।
-
From Beginning Presentation को Slide 1 से शुरू करता है।
-
F5 From Beginning की Shortcut Key है।
-
From Current Slide selected Slide से Presentation शुरू करता है।
-
Shift + F5 From Current Slide की Shortcut Key है।
-
Custom Slide Show selected Slides को custom order में Present करता है।
-
Hide Slide Slide को Delete किए बिना Slide Show से छिपाता है।
-
Rehearse Timings प्रत्येक Slide का Presentation Time record करने में मदद करता है।
-
Record Slide Show Presentation की Recording बनाने के लिए उपयोग होता है।
-
Play Narrations Recorded Voice/Narration को control करता है।
-
Use Timings Saved Slide Timings को Presentation में use करता है।
-
Show Media Controls Video और Audio के Playback Controls को control करता है।
-
Set Up Slide Show Presentation की Playback Settings configure करता है।
-
Monitor Presentation Output के लिए Display Select करने में मदद करता है।
-
Presenter View Presenter को Notes और Next Slide privately देखने देता है।
-
Presenter View Projector और Laptop के साथ बहुत उपयोगी है।
-
Rehearse Timings + Use Timings Self-Running Presentation के लिए उपयोगी है।
-
Custom Slide Show = Selected Slides का Presentation
-
Hide Slide = Delete नहीं, केवल Skip
-
F5 = Beginning
-
Shift + F5 = Current Slide
-
Animation = Object Effect
-
Transition = Slide Change Effect
-
Slide Show = पूरी Presentation को Run करना
PowerPoint Slide Show Tab FAQ
1. PowerPoint में Slide Show Tab का क्या उपयोग है?
Slide Show Tab का उपयोग Presentation को Start, Run, Record, Rehearse और Configure करने के लिए किया जाता है।
2. PowerPoint में Presentation शुरू करने की Shortcut Key क्या है?
F5 से Presentation को Beginning यानी Slide 1 से शुरू किया जाता है।
3. Current Slide से Presentation कैसे शुरू करें?
Shift + F5 दबाने पर Presentation Current/Selected Slide से शुरू की जा सकती है।
4. Custom Slide Show क्या है?
Custom Slide Show पूरी Presentation में से selected Slides को चुनकर उनका अलग Presentation Sequence बनाने की सुविधा देता है।
5. क्या किसी Slide को Delete किए बिना Hide कर सकते हैं?
हाँ। Hide Slide option से Slide को Presentation File में रखते हुए normal Slide Show में Skip किया जा सकता है।
6. Rehearse Timings क्या करता है?
Rehearse Timings Presentation की Practice करते समय प्रत्येक Slide पर लगने वाले समय को record करने में मदद करता है।
7. Record Slide Show क्या है?
Record Slide Show का उपयोग Presentation की उपलब्ध recording features के अनुसार Narration, Timings और Presenter/Camera Recording आदि record करने के लिए किया जाता है।
8. Use Timings क्या करता है?
Use Timings saved या rehearsed Slide Timings का उपयोग करके Slides को निर्धारित समय के अनुसार automatically आगे बढ़ाने में मदद करता है।
9. Presenter View क्या है?
Presenter View एक ऐसा mode है जिसमें Audience को मुख्य Slide दिखाई जाती है, जबकि Presenter को अपनी Screen पर Notes, Next Slide और Timer जैसी अतिरिक्त information दिखाई दे सकती है।
10. Presenter View का क्या फायदा है?
Presenter View से Presenter बिना Audience को दिखाए अपनी Speaker Notes और Next Slide देख सकता है।
11. क्या Presenter View के लिए दूसरा Monitor जरूरी है?
Presenter View का सबसे अच्छा उपयोग दो Displays, जैसे Laptop + Projector, के साथ होता है। Single-screen setup में इसका व्यवहार configuration के अनुसार अलग हो सकता है।
12. Present Online का क्या उपयोग है?
Present Online का उपयोग Remote Audience के साथ Presentation को online present/share करने के लिए किया जा सकता है। इसकी exact availability PowerPoint version और Microsoft 365 services पर निर्भर करती है।
13. Show Media Controls क्या करता है?
यह Slide Show के दौरान inserted Video और Audio के Playback Controls को दिखाने या छिपाने में मदद करता है।
14. Self-Running Presentation कैसे बना सकते हैं?
इसके लिए Rehearse Timings से Slide Timings तैयार करें और आवश्यकता के अनुसार Use Timings enable करें।
15. Backup Slide को Presentation में कैसे रखें लेकिन Live Show में न दिखाएँ?
उस Slide को select करके Hide Slide option का उपयोग करें।
16. अलग-अलग Customers के लिए अलग Slides कैसे दिखाएँ?
एक ही Master Presentation में Custom Slide Show बनाकर अलग-अलग customers के लिए अलग Slide Sets तैयार किए जा सकते हैं।
17. Slide Show और Animation में क्या अंतर है?
Slide Show पूरी Presentation को Run करता है, जबकि Animation Slide के Individual Objects पर visual effects लागू करता है।
18. Slide Show और Transition में क्या अंतर है?
Slide Show Presentation की playback को control करता है, जबकि Transition एक Slide से दूसरी Slide के बीच change effect को control करता है।
19. Live Presentation में कौन-सा feature सबसे उपयोगी है?
Projector या second display के साथ Presenter View बहुत उपयोगी है क्योंकि Presenter को Notes और Next Slide privately दिखाई जा सकती है।
20. Slide Show Tab को याद रखने की आसान Trick क्या है?
Start → Presentation शुरू करें
Set Up → Presentation की Settings करें
Monitors → Presentation Display को Manage करें
Final One-Line Revision
PowerPoint Slide Show Tab = Presentation को Start + Rehearse + Record + Time + Configure + Present करने का Tab।
💬 Leave a Comment & Rating