MS Word Mailings Tab
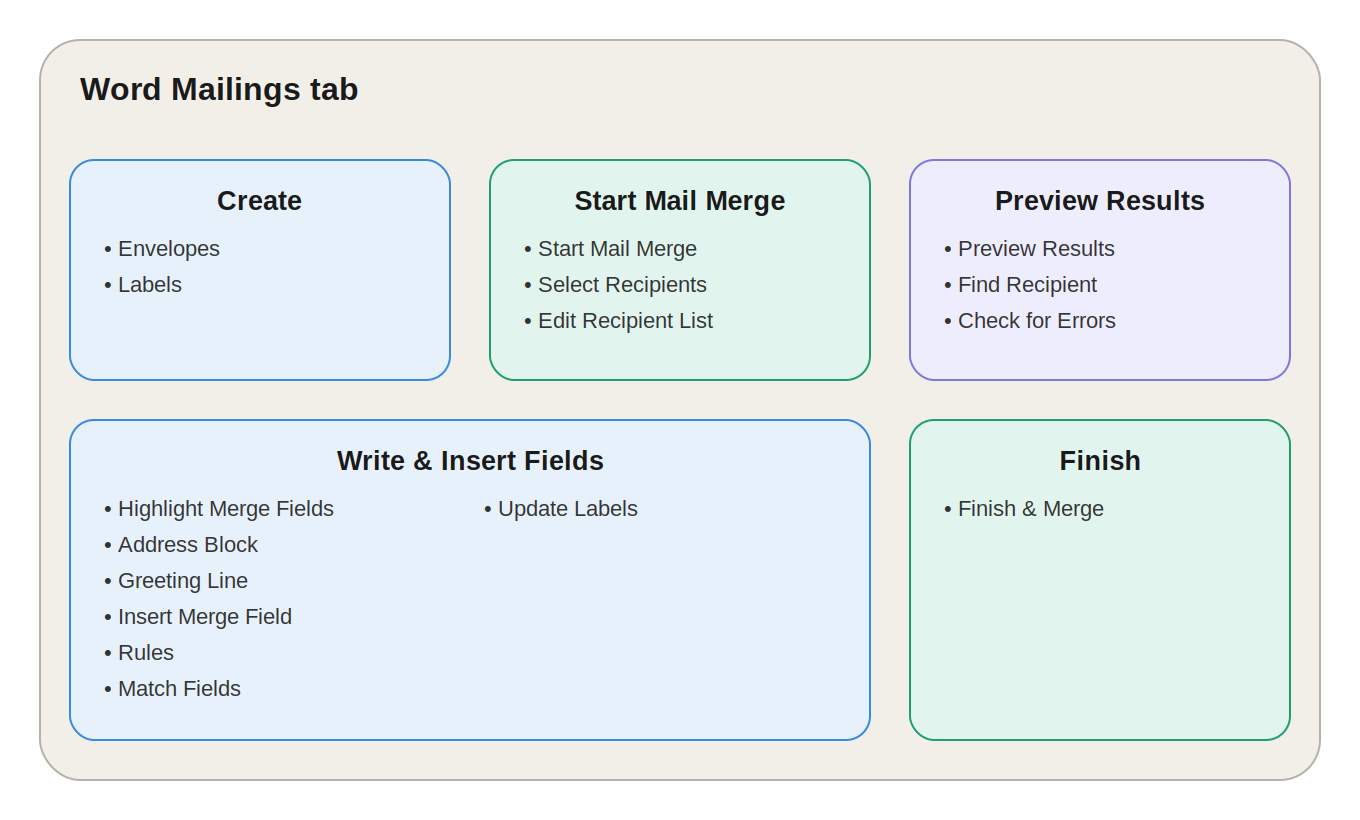
MS Word Ribbon में Mailings Tab, References Tab के बाद आता है, और इसका मुख्य काम है — Mail Merge।
Mail Merge की मदद से एक ही document template को अलग-अलग लोगों के Name, Address, Email, Company जैसे data के साथ automatically personalize करके बड़ी संख्या में Letters, Envelopes, Labels और Emails तैयार किए जा सकते हैं।
उदाहरण: अगर 500 लोगों को एक जैसा letter भेजना है लेकिन हर letter में अलग Name और Address चाहिए, तो हर letter manually बनाने की ज़रूरत नहीं — Mail Merge यह पूरा काम automatically कर देता है।
Mailings Tab के 5 मुख्य Groups हैं:
- Create
- Start Mail Merge
- Write & Insert Fields
- Preview Results
- Finish
1. Create Group
छोटे printing tasks के लिए, जहाँ पूरे Mail Merge की ज़रूरत नहीं होती।
- Envelopes: Delivery और Return Address जोड़कर सीधे envelope print करने के लिए।
- Labels: Mailing labels, name tags और address labels बनाने के लिए — Single या Multiple दोनों तरह से, और बाद में इन्हें Mail Merge के साथ भी जोड़ा जा सकता है।
2. Start Mail Merge Group
यह Mail Merge process की सबसे important शुरुआत है।
Start Mail Merge — Document Type चुनें
| Type | इस्तेमाल |
|---|---|
| Letters | एक ही letter को कई recipients के लिए personalize करना |
| Email Messages | एक ही email template को कई recipients को personalize करके भेजना |
| Envelopes | कई addresses के आधार पर envelopes बनाना |
| Labels | कई recipients के लिए address labels बनाना |
| Directory | एक ही document में कई records को list/catalog की तरह दिखाना |
💡 Word में Step-by-Step Mail Merge Wizard भी उपलब्ध है जो पूरी प्रक्रिया में guide करता है।
Select Recipients — Data Source चुनें
Recipients की जानकारी वाला Data Source select किया जाता है:
| First Name | Last Name | City | |
|---|---|---|---|
| Rahul | Sharma | Jaipur | rahul@example.com |
| Amit | Verma | Kota | amit@example.com |
| Neha | Singh | Ajmer | neha@example.com |
Data Source के लिए विकल्प: Existing List, Excel Spreadsheet, Outlook Contacts, या Type a New List (Word के अंदर ही नई list बनाना)।
Edit Recipient List
Recipients को manage करने के लिए — records देखना, Sort करना, Filter करना, और specific लोगों को Exclude करना।
उदाहरण: 500 customers में से सिर्फ Jaipur के 100 को letter भेजना है, तो list को filter करके सिर्फ Jaipur वाले records select किए जा सकते हैं।
3. Write & Insert Fields Group
Document को personalize करने का असली काम यहीं होता है।
| Option | काम |
|---|---|
| Highlight Merge Fields | Document में Merge Fields (जैसे «First_Name») को highlight करके दिखाता है |
| Address Block | Recipient का पूरा mailing address (Name, Street, City, State, ZIP) automatically insert करता है |
| Greeting Line | Personalized greeting बनाता है, जैसे Dear Mr. Sharma, — नाम न होने पर fallback भी सेट किया जा सकता है |
| Insert Merge Field | Data Source के किसी specific field (Name, Company, Order Number आदि) को document में डालता है |
| Rules | Conditional logic लगाता है — जैसे City = Jaipur होने पर अलग greeting दिखाना |
| Match Fields | Excel के column names (जैसे Surname) को Word के expected fields (Last Name) से map करता है |
| Update Labels | Labels बनाते समय एक label की formatting बाकी सभी labels पर apply करता है |
4. Preview Results Group
Merge complete करने से पहले output verify करने के लिए।
- Preview Results: Merge Fields की जगह actual data दिखाता है — जैसे
«First_Name»की जगह Rahul दिखेगा। - Find Recipient: 1000 recipients में से किसी specific व्यक्ति (जैसे Rahul Sharma) को जल्दी खोजने के लिए।
- Check for Errors: Merge complete करने से पहले संभावित errors या गलत data को पहचानने के लिए।
5. Finish Group — अंतिम चरण
Finish & Merge से पूरी प्रक्रिया final output में convert होती है, इसके तीन विकल्प हैं:
| Option | काम |
|---|---|
| Edit Individual Documents | हर recipient का personalized output एक नए document में generate करता है, जिसे review/edit/save किया जा सकता है |
| Print Documents | Merged documents को सीधे printer पर भेजता है — जैसे 500 letters batch में print करना |
| Send Email Messages | Personalized emails सीधे भेजता है (Data Source में Email field होना ज़रूरी है) |
Mail Merge कैसे काम करता है? (Step-by-Step)
फॉर्मूला: Main Document + Data Source + Merge Fields = Personalized Documents
- Main Document तैयार करें — एक common letter।
- Data Source बनाएं — Excel में recipients की list।
- Select Recipients — Word में Excel/Data Source connect करें।
- Insert Merge Fields — Letter में
«First_Name»,«Address»जैसे fields डालें। - Preview Results — Actual data के साथ document check करें।
- Finish & Merge — Edit, Print या Email में से चुनें।
Practical Example — Student Certificates
Excel Data:
| Name | Roll No | Class | Marks |
|---|---|---|---|
| Rahul | 101 | 10th | 85 |
| Amit | 102 | 10th | 91 |
| Neha | 103 | 10th | 88 |
Common Template:
Dear «Name», Your Roll Number is «Roll_No». Your Marks are «Marks».
Mail Merge के बाद:
Rahul के लिए: Dear Rahul, Your Roll Number is 101. Your Marks are 85. Amit के लिए: Dear Amit, Your Roll Number is 102. Your Marks are 91.
एक ही template से अलग-अलग personalized documents तैयार हो जाते हैं।
Mail Merge के मुख्य Components
| Component | Meaning |
|---|---|
| Main Document | Common document/template |
| Data Source | Recipients का data |
| Merge Field | Data Source का individual field |
| Recipient List | जिन लोगों को document भेजना है |
| Preview | Final output पहले से देखना |
| Finish & Merge | Final documents generate करना |
Real-Life Use Cases
| Use Case | कैसे काम आता है |
|---|---|
| Mass Letters | Customers/Employees/Donors के लिए personalized letters |
| Certificates | Student list से automatically अलग-अलग नाम के certificates |
| Invitations | Guest list से personalized invitations |
| Envelopes | Customer list से बड़ी संख्या में mailing envelopes |
| Labels | Excel list से hundreds of address labels |
| Bulk Email | Common email template को नाम के साथ personalize करना |
Mail Merge के फायदे
- समय की बचत करता है
- Repetitive typing कम करता है
- Human errors घटाता है
- बड़ी संख्या में documents जल्दी तैयार करता है
- हर document को personalize करता है
- Excel जैसे Data Source के साथ काम करता है
- Letters, Labels, Envelopes और Emails — सभी के लिए उपयोगी है
Quick Revision — Mailings Tab के सभी Groups
| Group | Main Functions |
|---|---|
| Create | Envelopes, Labels |
| Start Mail Merge | Merge type और Recipients select करना |
| Write & Insert Fields | Address, Greeting और Merge Fields insert करना |
| Preview Results | Final data preview और error checking |
| Finish | Edit, Print या Email करना |
10 One-Liner Question-Answer
- Mailings Tab का मुख्य उपयोग क्या है? → Mail Merge करना।
- Mail Merge क्या करता है? → एक common document को कई personalized documents में बदलता है।
- Select Recipients किसलिए है? → Data Source select करने के लिए।
- Edit Recipient List क्या करता है? → Recipients को Filter, Sort और Exclude करता है।
- Insert Merge Field क्या करता है? → Individual data field document में insert करता है।
- Address Block किसलिए है? → Recipient का पूरा address automatically insert करने के लिए।
- Greeting Line क्या करता है? → Personalized greeting insert करता है।
- Rules का उपयोग क्या है? → Conditional personalization के लिए।
- Preview Results किसलिए है? → Merge से पहले actual data check करने के लिए।
- Finish & Merge में कौन-से तीन options हैं? → Edit Individual Documents, Print Documents, Send Email Messages।
FAQ:
1. MS Word में Mailings Tab का उपयोग किसलिए किया जाता है? मुख्य उपयोग Mail Merge के लिए होता है, जिससे कई personalized Letters, Labels, Envelopes और Emails बनाए जा सकते हैं।
2. Mail Merge क्या है? यह एक feature है जो Main Document को Data Source के साथ combine करके हर recipient के लिए personalized document तैयार करता है।
3. Select Recipients का क्या काम है? Mail Merge के लिए Data Source (Excel, Existing List या New List) को connect करना।
4. Insert Merge Field क्या है? इससे Data Source के individual fields जैसे Name, Address, Email को document में insert किया जाता है।
5. Preview Results का क्या उपयोग है? Final Mail Merge output को actual data के साथ merge होने से पहले check करना।
6. Finish & Merge में कौन-कौन से options होते हैं? Edit Individual Documents, Print Documents और Send Email Messages।
7. Mail Merge में Excel का क्या उपयोग है? Excel को Data Source के रूप में इस्तेमाल किया जा सकता है, जिसमें recipients की जानकारी stored होती है।
8. Envelopes और Labels का क्या उपयोग है? Envelopes से mailing envelopes और Labels से address labels या name tags तैयार किए जाते हैं।
9. Mail Merge का सबसे बड़ा फायदा क्या है? एक common template से बहुत सारे personalized documents जल्दी और efficiently तैयार करना।
निष्कर्ष (Conclusion)
Mailings Tab MS Word का वह powerful टूल है जो bulk communication को आसान बना देता है। चाहे 50 letters भेजने हों या 5,000 personalized certificates बनानी हों — Mail Merge के छह आसान चरण (Main Document → Data Source → Recipients → Merge Fields → Preview → Finish) समझ लेने के बाद यह पूरा काम मिनटों में automatic हो जाता है, वो भी बिना किसी manual repetition के।
💬 Leave a Comment & Rating